

|
Note -- you have reached the original astrophotographs.com website. Thanks very much for visiting. Logo contact information has been updated (i.e. we moved to Taos, NM) as below: Willis Greiner You may also want to visit Willis' new astronomy site at: taosastronomer.com/ "Introduction to CCD Imaging" With astrophotography, photographic film is placed at the focal plane ("focus") of the telescope's optical system. With CCD imaging, an electronic CCD (charge coupled device) chip consisting of many pixels (or photosites) is placed at the focal plane. Parameters with film include, most importantly, speed (sensitivity to light) and attributes of color and grain. Parameters of CCD chips include the abnormalities of the individual photosites (similar to film grain) and the inherent existence of electronic noise. The differences noted above are due to a few facts:
1 -- Film is essentially "slow;" that is, it takes a relatively long time for deep-sky images to be recorded. This phenomena is further complicated by what is called "reciprocity failure," or the film's non-ability to record the dim image in a linear way over time. In other words, the film records less information in the second minute of an exposure than it does in the first minute. Because of this, astrophotographers have been forced to limit their time exposures to compensate. Further, the "sky background" (light pollution and just the general brightness of the sky) increases over the time of the exposure, so exposures must be kept relatively short so as to not have excessively bright sky backgrounds. 2 -- Film's grain still increases with speed, although the technologies of film grain have become very advanced. Nevertheless, to use a fast film is to use a grainy film. Recording dim objects (like nebulae and galaxies) with film, then, introduces some compromise. Enter the field of electronic CCD imaging. Actually, this sort of imaging has been around a long time, as we have been receiving and processing electronic images from spacecraft for decades. Also, common home video cameras work on somewhat the same principle. The limiting parameters for CCD astronomy applications include: 1 -- Although the CCD chip is very much more sensitive to light, and it records the light in a linear fashion (no reciprocity failure here) other compromises exist. First of all the chip needs to be super-cooled to possess such sensitivity. Further the sensitivity of individual photo sites (think "grain") is variant. 2 -- The photosites, even under the super-cooled conditions described above, aren't perfect. They vary in attributes from site to site. Because of this, electronic calibration must be performed to overcome these flaws. 3 -- The thermal signal (or "dark current") of the CCD chip increases over time. If the chip is cooled, this will compensate to some degree; however, final compensation can only be accomplished by additional electronic calibration. 4 -- Because your image is previewed, focused and saved on a "local" laptop computer, CCD imaging requires a lot more expensive equipment. Also, even after the above-mentioned electronic calibrations (accomplished by "shooting" additional frames as described below in the typical CCD observing session checklist) are done, what you are left with is a digital file. Are these "real" photographs? Probably yes, but when you additionally "modify" them by using ultra-complex image-processing routines, are you then "creating" additional data, or just "adjusting" real data?
A typical CCD
Imaging checklist follows: Set up telescope Why "shoot"
CCD images?
If you're still interested, explore the links included within this web site, or feel free to e-mail me with questions. I'm only a novice on this subject, but perhaps I could point you in the right direction. This overview doesn't really scratch the surface of this very complex subject. As noted, please refer to the links provided here and in the "Cool Links" section for many more details. Also consider trying CCD imaging for yourself.

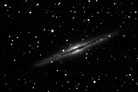
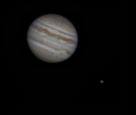
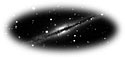
All images and narratives copyright Willis Greiner, all rights reserved.
|
|||||||||||||||||||||||||||||||||||||||||||||||||||||||||||||||||||||||||||